Best Practices for Ladybug
Preparing for Use
Before you use your camera, we recommend that you are aware of the following resources:
- Getting Started Manual for the camera—provides information on installing components and software needed to run the camera.
- Technical Reference for the camera—provides information on the camera’s specifications, features and operations, as well as imaging and acquisition controls.
- Firmware updates—ensure you are using the most up-to-date firmware for the camera to take advantage of improvements and fixes.
- Software development kit (SDK) updates—ensure you are using the most up-to-date SDK for the camera to take advantage of improvements and fixes.
 |
SDK bug fixes and performance improvements happen often. Visit the site regularly to update your SDK and take advantage of the latest improvements to achieve the best performance from your Ladybug. |
- Technical Application Notes—For additional guidance, see Using the Ladybug in a Mobile Setting and Diagnosing and Fixing Connectivity Errors with Ladybug.
- Tech Insights—Subscribe to our monthly email updates containing information on new knowledge base articles, new firmware and software releases, and Product Change Notices (PCN).
System Requirements for Capture
System Configuration
Because of Ladybug’s high demand on bandwidth during the capture phase, it is important to match the camera’s requirements with the capacity of your system. This table lists the recommended minimum system requirements. See the Technical Reference manual for operating modes and expected data rates.
| Component | Capture | Processing |
| CPU | Intel Core i5 or newer processor | Intel Core i7 or newer processor |
| OS |
Windows 10, 64‑bit |
Windows 10, 64‑bit Ubuntu 20.04 64-bit |
| RAM | 8 GB | 16 GB |
| Storage | RAID array or SSD capable of sequential data write speed of at least 240 MB/s. Depends on actual streaming bandwidth of the camera. |
|
| Video Card | Intel HD Graphics or newer | NVIDIA Quadro or newer |
| Host Adaptor | USB3 host adaptor | |
|
Cables |
Ladybug6:
Ladybug5+:
|
|
| Power | 12-pin GPIO power cable and wiring harness Ladybug6: ACC-01-9001 The Ladybug power which must be provided by an external power supply connected to the GPIO cable. |
|
| Driver | PGRUSBCam for onboard USB3 port (included in Ladybug SDK installation) | |
| Software | Ladybug6: Ladybug SDK 1.17 or later Ladybug5+: Ladybug SDK 1.15 or later |
Ladybug6:
Ladybug5+:
|
| Firmware | Use the latest firmware available. | Use the latest firmware available. |
There is a development kit (DEVKIT-01-0008) offered to support the Ladybug6 which includes:
- Interface Card—USB 3.1 Gen 1 Host Controller Card (Dual port) (ACC-01-1201)
- Cable—1 m USB 3.1 Gen 1, Type A-male locking to M12-male (ACC-01-2308)
- Cable—3 m USB 3.1 Gen 1, Type A-male locking to M12-male (ACC-01-2309)
- Cable—5 m USB 3.1 Gen 1, Type A-male locking to M12-male (ACC-01-2310)
- Power Supply (ACC-01-9001)
- GPIO—M12 to DC barrel connector + pigtails (6 m) (ACC-01-3016)
- Mount—Desktop tripod mount combination (ACC-02-0001)
- Hub—USB 3.1 Gen 1 Hub VIA VL812 1-port screw locks (ACC-01-6001)
All items in the development kit can be purchased separately by individual part numbers.
Although a shorter cable (5 meters or less) is recommended, a hub and active cables may be used to extend the cable length beyond 5 meters and to improve connectivity. We recommend using a hub when using a laptop or when using cables longer than 3 meters.

The Ladybug6 has worked successfully with the following systems:
- HP Elitebook 830 G5
- Lenovo P50
Software Requirements
The Ladybug SDK is required to capture and process images from the Ladybug.
- Download and install the Ladybug SDK.
- In the Driver Selection window, select I will be using any of the following cameras: Ladybug5, Ladybug5+, Ladybug6.
After installation, to manage and update drivers, use the DriverControlGUI utility in the SDK.
- To open the DriverControlGUI:
Start Menu → Point Grey Ladybug SDK → DriverControlGUI. - Select the interface from the tabs in the top left.
- Select your interface card to see the current setup.
- From the Driver Selection drop-down, select the new driver and click the Install Driver button.
Tools for Optimizing Ladybug Capture
There are a number of options to optimize the results when capturing images. Some settings must be established before capture and are not available at the processing stage.
There are two windows which provide access to the camera controls:
- Ladybug Recorder provides direct access to the main settings used during capture. We recommend using this tool during capture.
- LadybugCapPro Camera Control dialog has a more comprehensive selection of options but a more complicated interface.
Using Ladybug Recorder
To open the Ladybug Recorder:
Start Menu → Point Grey Ladybug SDK → Ladybug Recorder.
The Ladybug Recorder provides access to these options:
- Record: Stop/Start and Pause
- GPS On/Off. Click to open GPS window.
- Pixel format (includes 8-bit, 12-bit, uncompressed JPEG)
- Shutter Range Mode (includes Motion, Indoor, Low Noise)
- Exposure ROI (Region of Interest)
- IEx (Independent Exposure)
- One Shot Auto White Balance (WB)
- Settings (includes Compression Quality, Frame Rate, and Gamma)
Using LadybugCapPro
To open LadybugCapPro:
Start Menu → Point Grey Ladybug SDK→ LadybugCapPro
![]()
LadybugCapPro main toolbar provides access to the following options discussed in Optimizing Post Processing:
- Color Processing
- Image Quality
- Dynamic Stitching
For information on all of the features of LadybugCapPro, see the Technical Reference or the Ladybug SDK Help.
Recommended Optimization Capture Settings
Use Ladybug Recorder to set the following options prior to starting image capture.
Pixel Format
There are two options that relate to pixel depth and post processing controls:
- 12-bit JPEG Processed setting is a new feature available only with Ladybug6 that offers the same on-camera processing as 8-bit formats.
| 8-bit Pixel formats JPEG12Processed* *Ladybug6 only |
On-Camera Processing |
|
| Post Processing on PC |
|
|
12-bit Pixel Formats JPEG12 (unprocessed) |
On-Camera Processing |
|
| Post Processing on PC |
|
Shutter Range Mode
There are three preset shutter range modes. Choose the shutter range according to the conditions of use, as defined below:
- Motion—This is the default setting. The maximum shutter time is set as short as possible to prevent motion blur. It is best used outdoors while driving at highway speed or the resulting images may be too dark.
- Indoor—The maximum shutter time is slightly longer than the motion mode. Use for indoor applications and when the camera motion approximates walking speed.
- Low Noise—The maximum shutter time is not restricted. Use when the camera is stationary or operating in conditions of low light.
Gamma
When using 12-bit (unprocessed) mode, gamma correction is done at the post processing stage.
When using 8-bit or JPEG12Processed mode, the gamma option must be turned on before you start the capture process. It cannot be changed once this process has begun.
- In Ladybug Recorder, click Settings to access gamma.
- Set gamma to a value between 1.8 and 2.2.
Automatic White Balance (AWB)
AWB is a system of color correction used for different lighting conditions. It is adjusted by modifying the relative gain of R, G, and B to keep white areas looking white under changing lighting conditions. If you write your own collect software, make the API call for AWB every 20 frames.
When using 12-bit (unprocessed) mode, AWB is adjusted during post processing.
When using 8-bit or JPEG12Processed mode, the AWB can only be set during the capture stage. In Ladybug Recorder, click the AWB button occasionally while capturing to adjust for changes in lighting conditions.
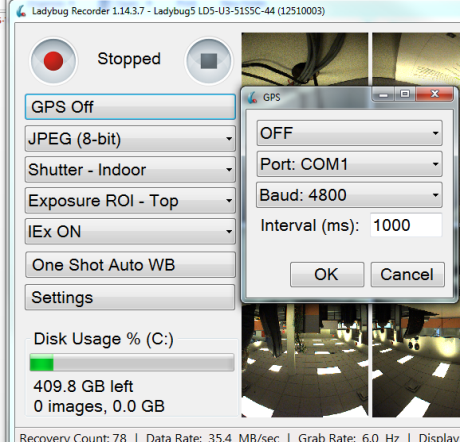
GPS
Turn on GPS and set the data update interval time before capture. Set the interval for double the output rate of the GPS. For example, if GPS sends out data every 1 second, set the interval to 500 ms.
To turn on the GPS option for one use, use Ladybug Recorder:
- In Ladybug Recorder, click GPS.
- Set the ON/OFF drop-down to ON.
- Set the Update Interval in ms.

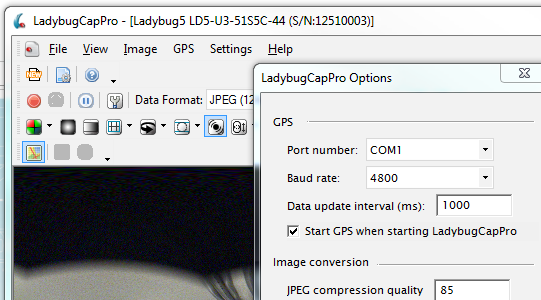
To turn on the GPS option every time LadybugCapPro is started:
- In LadybugCapPro, from the Settings menu, select Option.
- In the Options dialog, select Start GPS when starting LadybugCapPro.
- Set the Update Interval in ms.
Optimizing Post Processing
There are a number of options to set during post processing to improve image results. Access the following controls using LadybugCapPro main toolbar.
Color Processing
To improve the color processing results:
- From the LadybugCapPro main toolbar, click the color processing button.
- Select High Quality Linear. If using an NVIDA graphics card, select High Quality Linear GPU.
This selection must be made every time LadybugCapPro is started.

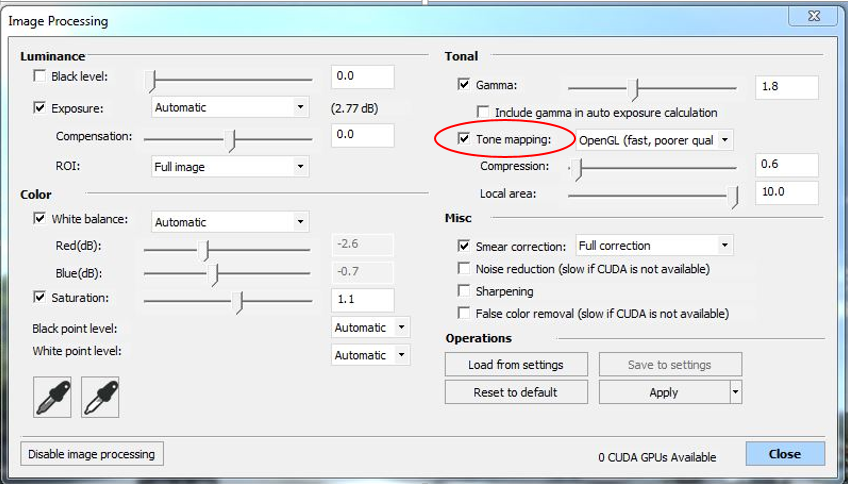
Image Quality
The Image Processing window shows the default settings, which are the recommended settings for best image quality. Tone Mapping is not turned on as a default setting, but should be turned on to improve quality. To access these controls, from the Settings menu, select Image Processing.
Dynamic Stitching
The captured images are “stitched” together using an algorithm that examines the image overlap along each seam and determines various ranges values along it. There are three settings to control stitching, including two options for dynamic stitching. Click the button ![]() for the drop-down menu of settings as follows:
for the drop-down menu of settings as follows:
- Manual—sets the sphere size to a fixed range.
- Dynamic (one-shot)—makes adjustments based on information from a single image and uses these results on all following frames.
- Auto Dynamic stitch—runs the pattern-matching algorithm on every frame. The processing speed is slower, but fewer image artifacts appear when the scenery changes. The default setting for the minimum and maximum distance is 2 meters – 100 meters.
To improve the speed for this option:
- From the Settings menu, select Options.
- Adjust the values in in the Options dialog.
To improve the processing time of the pattern-matching algorithm, narrow the range, for example, to 4 meters – 20 meters.
Camera Care
Follow these guidelines to help protect Ladybug from damage:
- Avoid:
- excessive shaking, dropping, or mishandling of the camera;
- extended exposure to bright sunlight, rain, or dust;
- electrostatic charge; and
- touching the lenses when handling the camera.
- To clean the lenses, use a standard camera lens cleaning kit or a dry cotton cloth. Avoid heavy pressure.
- If the Ladybug is mounted to a vehicle and stored outside, cover the camera when not in use to prevent the accumulation of dust and pooling of precipitation on the lenses.
| |
Do not open the camera housing. This voids the warranty. |