Getting Started with Cognex VisionPro
Preparing for Use
Before you use your camera, we recommend that you are aware of the following resources available from our Downloads page:
- Getting Started Manual for the camera—provides information on installing components and software needed to run the camera.
- Technical Reference for the camera—provides information on the camera’s specifications, features and operations, as well as imaging and acquisition controls.
- Firmware updates—ensure you are using the most up-to-date firmware for the camera to take advantage of improvements and fixes.
- Tech Insights—Subscribe to our monthly email updates containing information on new knowledge base articles, new firmware and software updates, and Product Change Notices.
Installation and Configuration
The steps for installing and setting up the Cognex VisionPro depend which interface your camera uses.
FireWire Cameras |
GigE Vision Cameras |
USB3 Vision Cameras |
|
1. Install Cognex VisionPro. |
1. Install Cognex VisionPro. |
1. Install Cognex VisionPro and install FlyCapture2 AIK. |
|
2. Connect the camera to the PC. |
2. Connect the camera to the PC. |
2. Connect the camera to the PC. |
|
3. Verify FireWire Driver. |
3. Verify IP Address and network adaptor driver. |
|
|
4. Start Cognex VisionPro Software. |
4. Start Cognex VisionPro Software |
3. Start Cognex VisionPro Software. |
|
5. Capture Images. |
5. Capture Images. |
4. Capture Images. |
The following sections provide more detail.
Step 1—Install Cognex VisionPro
The examples used in this document are from Cognex VisionPro v8.2. It is available for download from the Cognex website.
The Cognex VisionPro installation supports FireWire and GigE Vision cameras. It includes required drivers and a GigE Configuration Tool (for GigE cameras only).
Cognex also offers as a separate download a free utility for FireWire cameras called DCAM Doctor which is a quick camera setup and acquisition tool.
For USB2 or USB3 cameras, FlyCapture2 AIK must also be installed. Contact FLIR Support (mv-support@flir.com) to request a copy of the FlyCapture2 AIK installer.
Step 2—Connect the Camera to the PC
Connect the camera to the PC. For information, see the camera’s Getting Started Manual.
Step 3—Verify FireWire Driver (FireWire cameras only)
For FireWire cameras, verify that the Cognex FireWire driver is installed.
To verify the FireWire driver:
- Open Windows Device Manager.
- Confirm the camera appears under Cognex Hardware.
![]()
If the camera does not appear under Cognex Hardware, follow the instructions in the Troubleshooting section to install the driver.
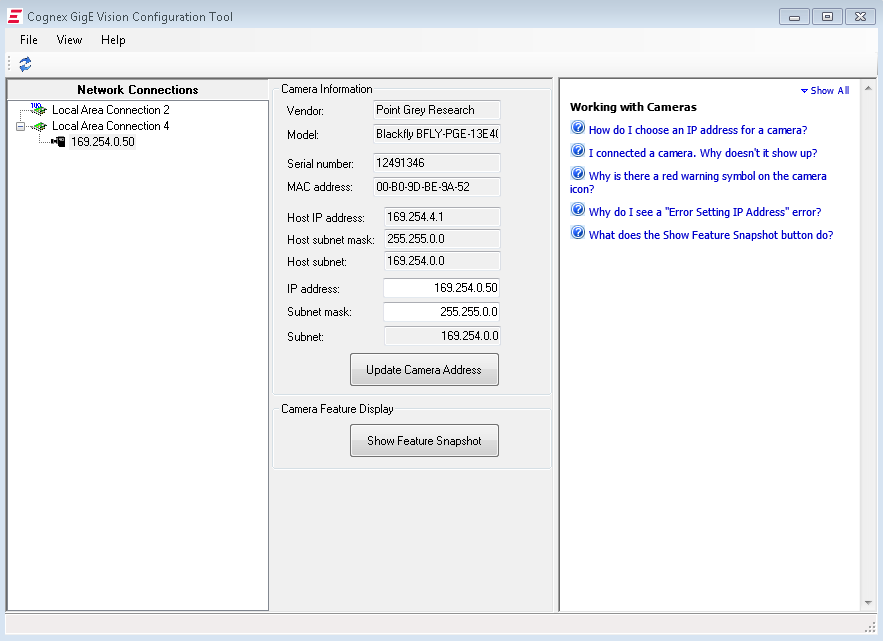
Step 3—Verify IP Address and network adaptor driver (GigE cameras only)
For GigE cameras, verify that the camera and network adaptor have compatible IP address settings and that your network adaptor is using the Cognex VisionPro GigE Vision driver, eBUS Universal Pro driver.
To verify GigE settings:
- Open Cognex GigE Vision Configuration Tool.
Start Menu→Cognex→VisionPro→Utilities→Cognex GigE Vision Configuration Tool
- From the Network Connection tree select the network adaptor to view the settings.
- From the Network Connection tree select the camera to view the settings.
|
|
When verifying IP addressing, remember that the camera should always be in the same subnet as the network adaptor. |

See the Troubleshooting section for details on using the Cognex GigE Vision Configuration Tool.
-
Step 4—Start Cognex VisionPro Software
To start Cognex VisionPro:
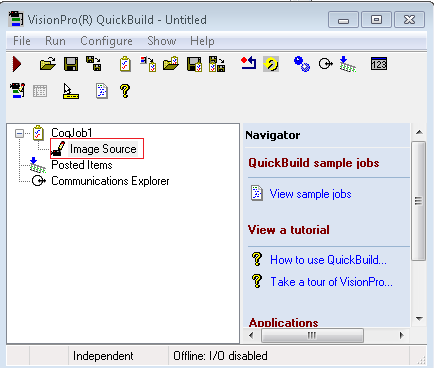
- Launch the Cognex VisionPro QuickBuild application.
Start Menu→Cognex→VisionPro→VisionPro® QuickBuild
- Double-click on Image Source to launch the Image Source and VisionPro QuickBuild Job Editor.

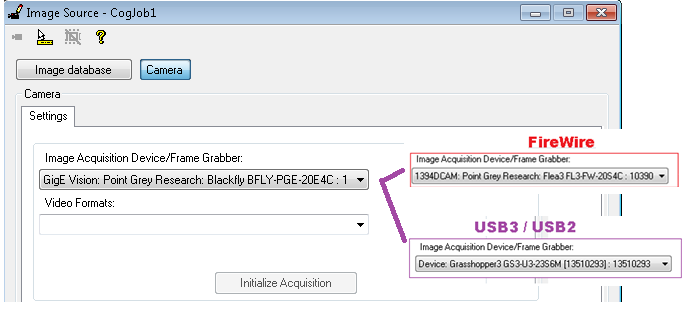
3. In the Image Source window, from the Image Acquisition Device/Frame Grabber drop-down, select your camera.

Step 5—Capture Images
To capture images:
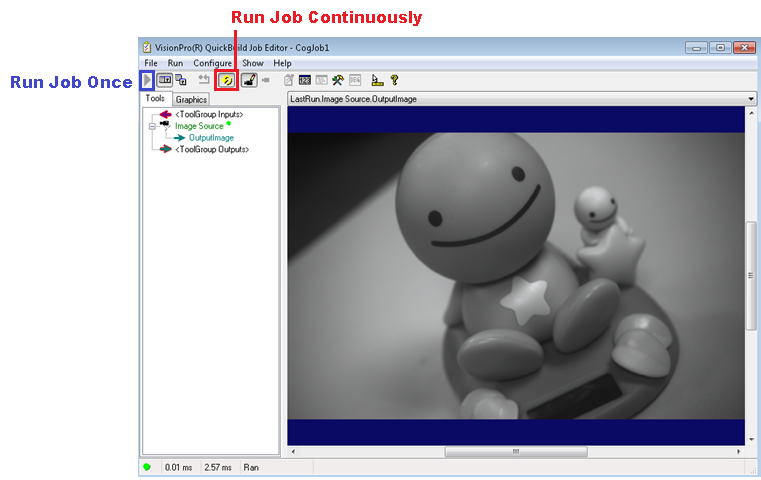
- In the VisionPro QuickBuild Job Editor window, from the Run menu select Job Continuously. Or, click the Run Job Continuously icon.

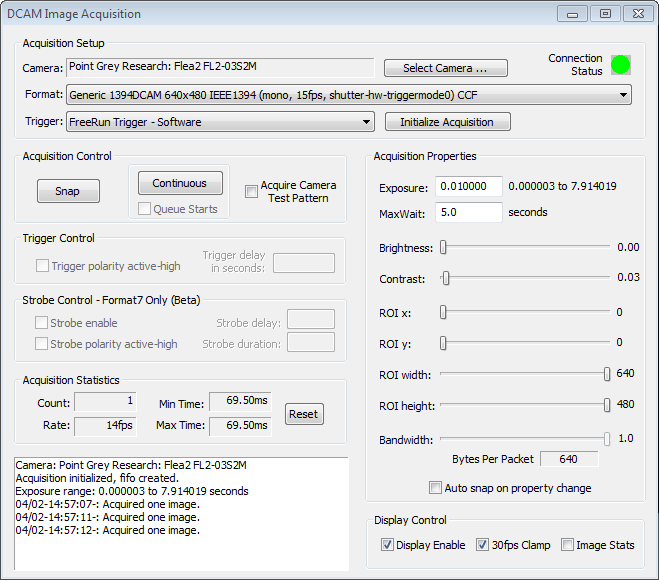
FireWire cameras can also use the free utility Cognex DCAM Doctor for quick camera setup and image capture.
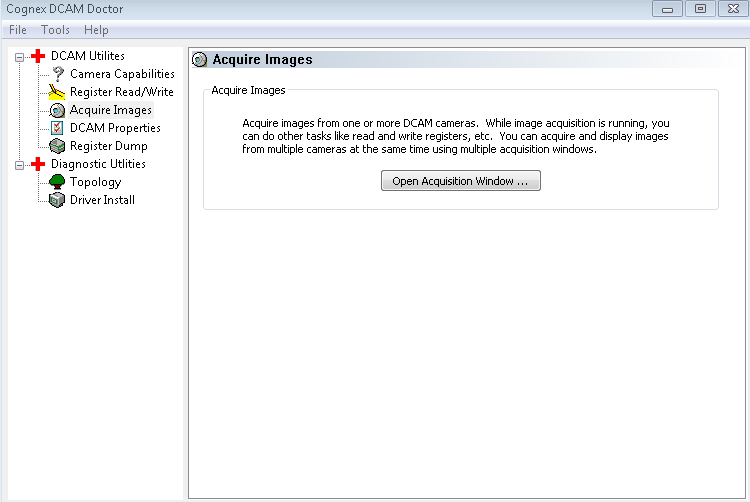
To use Cognex DCAM Doctor:
1 Launch DCAM Doctor from C:\Program Files\Cognex\VisionPro\bin\dcamdoctor.exe.
2 From the DCAM Utilities tree, select Acquire Images then click Open Acquisition Window.

3 In the DCAM Image Acquisition window, click Select Camera.
4 From the drop-down list, select any CCF file. Cognex configuration files (CCF) are stored in: C:\Program Files\Cognex\VisionPro\bin\
5 In the DCAM Image Acquisition window, click on Initialize Acquisition.
6 Click on Continuous to grab images continuously.

Troubleshooting Tips
FireWire Cameras
|
|
Cognex does not support FireWire cameras on 64-bit computers. |
Cognex VisionPro comes with its own FireWire driver, which needs to be installed for the FireWire camera. To install the Cognex driver for the camera, the PC’s FireWire host controller must be configured to use the Windows FireWire driver, and not the FirePRO driver.
Use Windows Device Manager to determine which FireWire driver is in use.
|
A. Shows a FireWire camera with the Cognex driver installed properly. The camera should be detected by Cognex VisionPro software. |
 |
|
Install the Cognex driver on the camera. |
 |
|
Install Microsoft’s FireWire driver on the host controller before switching to the Cognex FireWire driver on the camera. |
 |
|
D. Shows a FireWire host controller with the Microsoft FireWire driver installed. |
  |
To install the Microsoft FireWire driver on the host controller:
- In Windows Device Manager, right-click on the IEEE 1394b host controller.
- From the shortcut menu, select Properties.
- On the Drivers tab click Update Driver software.
- Click Browse my computer for driver software.
- Click Let me pick from a list of drivers on my computer.
- Select 1394 OHCI compliant host controller.

To install the Cognex FireWire driver on the camera:
- In Windows Device Manager, right-click on the camera.
- From the shortcut menu, select Properties.
- On the Drivers tab click Update Driver software.
- Click Browse my computer for driver software.
- Click Let me pick from a list of drivers on my computer.
- Browse to C:\Program Files\Cognex\Common\Drivers\mvs8100.inf.
- You may be required to reboot the PC for changes to take effect.
- Verify that the camera appears as Cognex Hardware.
GigE Cameras
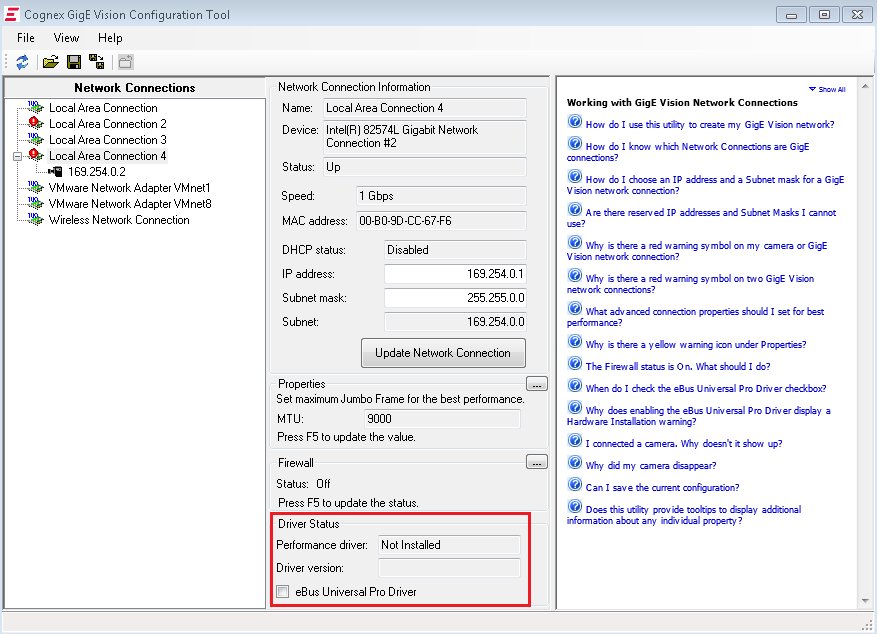
Cognex provides a GigE Vision configuration tool that allows you to configure your network card and GigE camera’s IP address. It also allows you to set jumbo frames for your network card. Jumbo frames is the recommended setting to stream GigE Vision cameras at full bandwidth.
Start Menu→CognexàVisionPro→Utilities→ Cognex GigE Vision Configuration Tool
When setting IP addresses keep in the mind the following:
- The GigE camera should have a unique IP address.
- The GigE camera should always be in the same subnet as the network adaptor.
|
|
To obtain a quick view of the supported features and their descriptions, select the camera and click the Show Feature Snapshot button. |
Cognex VisionPro comes with its own GigE Vision driver, eBUS Universal Pro driver, which needs to be installed for the network adaptor.
To install the Cognex driver:
- In the Cognex GigE Vision Configuration Tool window, select the Local Area Connection for the camera.
- Click the eBus Universal Pro Driver checkbox to install the driver.
USB2/USB3 Cameras
To use USB2/USB3 cameras with Cognex VisionPro, FlyCapture2 AIK must also be installed. Contact FLIR Support (mv-support@flir.com) to request a copy of the FlyCapture2 AIK installer.
If the USB2/USB3 camera is not streaming, verify the following:
- Is the camera detected in FlyCap2.exe (included in the FlyCapture2 SDK)?
- Is the camera able to stream in FlyCap2?
- Is the FlyCapture2 AIK installed?
- Is the AIK server running?
- Is the Quickbuild application running in Administrator mode?
To verify the FlyCapture2 AIK installation:
- Open C:\Windows\regedit.exe.
- Go to [HKEY_LOCAL_MACHINE\SOFTWARE\Cognex\AIK\AdapterFlyCapture2].
- Verify the DLL pointed by the LibName string exists.

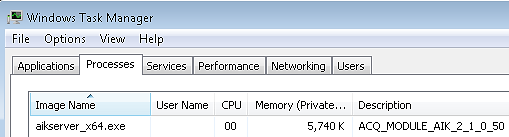
To verify the AIK server is running:
- While the camera is connected, start Cognex VisionPro.
- In the Windows Task Manager, on the Process tab, a process named “aikserver_x64.exe” (for 64-bit) should be visible. (For 32-bit, the process is “aikserver_x86.exe”.)

General Troubleshooting
The following suggestions may help you troubleshoot issues with your camera:
- Update the driver to the latest version.
- Update the firmware to the latest version.
- Update the software to the latest version.
- Perform a soft reboot and if still necessary a hard reboot of the PC.
- Disable then enable the driver.
- Power cycle the camera.
- Power the camera through GPIO, if wiring harness is available.
- Use a separate host controller instead of an integrated one, if available.
- Ensure the card is powered via the 4-pin hard drive connector, if applicable.
- Use a different cable or host controller or PC.